
To program the AVR Mega128 you need some programming hardware, some programming software, and of course the hex file you wish to program into the Mega128’s internal flash memory.
Programmer Hardware
Connector J7 on the player PCB is a 10-pin header for in-system programming (ISP) of the AVR. This connector uses the pinout of the Kanda systems programmer, commonly known as the programmer dongle supplied with the STK200 and STK300 series of AVR development boards. Atmel shipped these boards for a long time. Both the STK200 and STK300 dongles have been tested with this board.
This website also has a schematic for the dongle if you want to make your own.
http://www.lancos.com/e2p/avrisp-stk200.gif

You can see how simple it is; two connectors and one IC. If you don’t already have a AVR programmer it would be easy to breadboard your own.
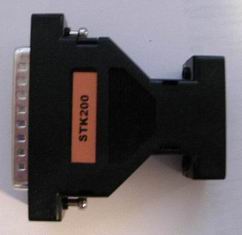
Here’s a photo of the Kanda dongle. It can say either STK200 or STK300; both types will work. On the left is the DB25 connector that plugs into a PC parallel port. On the right, hidden in this photo, is the 10-pin programming connector. A short length of ribbon cable connects it to the MP3 player board.
Recently Atmel has moved to a new ISP programming dongle (the AVR ISP, $34 from digikey) which has both the original 10-pin connector on it as well as a 6-pin connector. The signals are about the same; mainly the 6-pin just has fewer ground pins compared to the 10-pin header. Use the 10-pin header when programming the MP3 player (to switch between headers, read this.) Unlike the Kanda programmer, the Atmel unit plugs into a USB port on the computer.
Atmel also has a more expensive JTAG programmer. This requires separate pins routed to a separate connector, and is not supported on the player.
Programming Software
If you purchased a commercial programmer for the AVR it likely came with its own programming software. If you’re using a Kanda dongle, or an equivilant you built yourself, PonyProg is an excellent choice (and is what I use). It can be downloaded from:
http://www.lancos.com/prog.html
Remember to tell your programming software you have a Mega128. Usually in an options or configuration menu.
Unless you’ve changed things, the MP3 player source file you want to load into the flash memory of the AVR is called frankmp3.hex. You can find it on the software page, or you can build it yourself from the sources.
Programming Steps
Before you program the Mega128 AVR for the first time, there are a couple of things you need to check.
First, ensure the player diskdrive IDE cable is unplugged.
Second, make sure U1 and U2 are not overheating. Naturally you’ve already checked this as part of the construction process, and put heatsinks on them (and/or diodes in series with the power supply) if they were getting hot. Still, it’s always good to check.
Now the first programming task is to properly set the Mega128 configuration bits. These are programmable bits, separate from the main flash memory, that control how the chip behaves. These only need to be programmed once. But it’s very important that they are indeed programmed. For example, one of those configuration bits, by default from the factory, puts the Mega128 in “Mega103 compatibility mode”. This means the second UART is disabled by default, which means the LCD display wouldn’t work until this is corrected.
PonyProg Software Fuse Bits
If you’re using PonyProg, the required settings for the configuration bits are:
JTAGEN (JTAG enable) OFF
M103C (Mega103 compatibility mode) OFF
For using the 16 MHz crystal (required):
CKOPT ON
CKSEL3..1 OFF OFF OFF
CKSEL0 OFF
SUT1..0 OFF OFF
The following are optional, but this is what I have (recommended):
BootLock12, 11, 02, 01 all OFF
Lock2, Lock1 both OFF
WDTON OFF
OCDEN OFF
SPIEN ON
EESAVE OFF
BOOTSIZE1..0 ON ON
BOOTRST OFF
BODLEVEL ON
BODEN ON
When using PonyProg, these configuration bits are found in the Command – Security & Configuration Bits menu.
AVRISP Software Fuse Bits
If you’re using the AVRISP programming hardware, the programming software is included as part of the AVR Studio program, downloadable from Atmel’s website. Like PonyProg it too has a fuses bits setting, however its “look and feel” is quite different to PonyProg. This has led to a couple of folks accidently programming their fuse bits incorrectly. In certain cases this can be a bit of a pain to correct. To help prevent this from happening to others, I’ve described below the fuse bit settings for AVRISP. Only the items listed below should have their check-boxes ticked; all other boxes should be clear.
IN THE FUSES TAB:
– Boot Flash section size=4096 words Boot start address=$F000; [BOOTSZ=00]; default value
– Brown-out detection level at VCC=4.0V; [BODLEVEL=0]
– Brown-out detection enabled; [BODEN=0]
– CKOPT fuse (operation dependent of CKSEL fuses); [CKOPT=0]
– Ext. Crystal/Resonator High Freq.; Start-up time: 16K CK + 64 ms; [CKSEL=1111 SUT=11]
Turn Auto-verify & smart warnings on as well.
IN THE LOCKBITS TAB:
The defaults are OK, which are:
– Mode 1: No memory lock features enabled
– Application Protection Mode 1: No lock on SPM and LPM in Application Section
– Boot Loader Protection Mode 1: No lock on SPM and LPM in Boot Loader Section
Turn Auto-verify & smart warnings on as well.
Programming killed my AVR!
If this is you, what you did is accidently programmed the fuse bits to tell the Mega128 to use an external clock. As there is no external clock, it’s now playing dead. Click here to read more, including how to fix it.
Once the fuse bits are programmed….
Once you’ve programmed these bits, use your programming software to read them back from the Mega128 just to make sure they’re right. When you’re satisfied you can program the frankmp3.hex file into the AVR. This is usually rather trivial (file-open…, then Program, or similar).
You can now plug the IDE cable in (with the power off of course! :-). For subsequent programmings there is no need to unplug the IDE cable, nor do you need to reprogram the Mega128 configuration bits. Those two things only apply to the very first programming cycle.
You should now have a working MP3 player. Congratulations!